How I Make Cats
Before I start: Bear in mind that everyone is different; nobody ever taught me how to use polymer clay; and what works for me won’t necessarily work for you… or even for me on a different day. Experimentation is key, and if I ever had to stop messing around when I’m making my critters, I’d probably stop altogether.
All that being said, it can be helpful to get a glimpse of how other people do what they do, so here goes…
 With almost any sculpture I’m making, I begin by kneading the clay into a ball. I squish it and roll it and warm it till I’m happy with its consistency, then I make it spherical and work from there.
 The next thing is to pull out the various appendages: Four more-or-less equal legs, a longer tail and a fatter head.
 Give the head a couple of ears, and it should already be starting to look a little bit like a cat. It might even have some personality – if so, you might like to work with it.
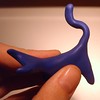 Either way, keep making the tail more tail-like, keep making the head more cat-like, and hopefully personality will emerge, whether through design or of its own accord.
The next thing is the eyes, and for me they are the single most important part of almost any critter I make. It’s amazing how much they can express, and how different that expression can be made by a shift of a millimetre or less. So take care over the eyes, but be prepared for them to surprise you.
 I start by rolling out a sausage of clay, because it’s easier to divide a sausage evenly.
 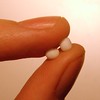 I tend to use glow-in-the-dark clay for this, because surprise cat eyes glowing in the dark amuse me, but obviously it’s down to personal preference. Divide the sausage into two roughly equal parts, and roll each one into a ball.
 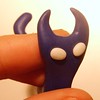 Unevenly sized eyeballs give an air of derangement, which is fun when you’re in the mood, but not always desirable. Attach the balls to the front of the head, and presto! You now have a cat that can stare at people.
 Next up are the pupils – each one half of a very small black sausage.
 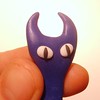 This is one of the fiddliest bits of the whole process, because the amount of clay involved is so tiny and black; I sometimes resort to using a tool to attach them to the eyeballs.
 Once the pupils are in place, I usually add eyelids. Sometimes I give a cat upper and lower lids, but most often I stick with just upper lids, each of which is made from a semi-circle of clay, created by forming a ball, then squashing it and halving it.
 The precise angle at which the lids are attached can easily make the difference between a critter which is sweetly looking for affection, and one which is brimming over with malevolence – great care is called for!
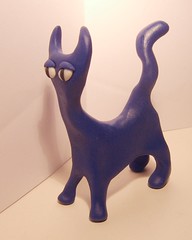 Once the cat has eyes in place, it is time to concentrate on the details of its body language – a tail is a beautifully expressive thing; the set of a cat’s ears and the angle of its head can tell you a great deal; the way it’s standing is crucial too.
That’s about it; if the texture of the piece is okay and there aren’t any niggling mistakes, it’s time to stick it in the oven! Sometimes it is worth laying a cat on its side at this stage, or supporting it around the middle, because polymer clay legs are flimsy things at the best of times – and can turn downright floppy while they’re being baked.
Technorati tags: sculpture, polymer clay, Fimo, Sculpey
I love your scuptures! I’ve loved them since I first saw them on Flickr!
Comment by Jolene — 4 March 2007 @ 16:38
edit: sculptures, I mean.
Comment by Jolene — 4 March 2007 @ 16:38
[…] Oolong’s Zoo » How I Make Cats (tags: art cats tutorials howto fimo) […]
Pingback by AIXπ » links for 2007-03-05 — 5 March 2007 @ 21:31
I relly like your wonderful sculptures that you or group makes. you really inspired me!!!!!!! Thanks
Comment by Kim Le Tran — 16 March 2007 @ 23:45
I put a link (with a photo of your cat) to your tutorial on Flickr – Group “Just Beads”, I hope you don’t mind 😉
If you want to visit the group or join us, please click: on :http://www.flickr.com/groups/justbeads/
Comment by Sandra Diniz — 11 April 2007 @ 09:07
Hi Sandra, that’s absolutely fine – but perhaps you could link the photo to the relevant Flickr set?
Comment by Fergus Ray Murray — 11 April 2007 @ 09:11
Wow, I love your cat sculptures, great stuff
Comment by Cat Owners Help — 5 September 2007 @ 22:13
[…] Much of what I wrote in How I Make Cats applies more-or-less across the board, so rather than going in to great detail about every beastie you might like to make, I am instead going to try to summarise what makes them unlike cats to sculpt, looking at distinguishing features rather than techniques… […]
Pingback by Oolong’s Zoo » How I Make Creatures That Aren’t Cats — 31 March 2008 @ 13:12
Love your work, mind if I try a cat in your style?
Comment by Sara Reading — 23 May 2008 @ 17:19
[…] How I Make Cats in my sculpture blog for more detailed […]
Pingback by How To Make A Clay Sculpture | How To Make — 3 November 2011 @ 14:14