I’d been vaguely wanting to try making puppets for years, but apart from a couple of days working on Big Man Walking in 2009 I’d never really had the opportunity – until the 2010 Beltane Fire Festival, when Morag Patterson announced at the open meeting that she would be running a group of Red Puppeteers.
 In the context of Edinburgh’s Beltane, Red stands for vitality – for the chaotic, unrestrained aliveness of our animal selves – much the same energy that the Horned God stands for in some of the world’s ancient religions. Sexuality is a part of that, and humour, too.
I went to the first meeting of the Red Puppeteers with no idea what I was going to make, but I came away with an image lodged firmly in my mind – a horned goddess, bug-eyed and maybe a little addled, partly inspired by the cave painting at Trois Freres that is sometimes known as ‘The Sorcerer’.
On reason I was particularly drawn to puppets in the Beltane context was that Beltane – spectacular as it is – doesn’t always make it easy to see what’s going on. Having puppets even a head and shoulder taller than the crowd makes a big difference, but I decided I wanted to make something big.
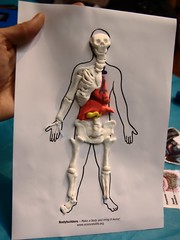
Once I had a rough idea of the dimensions I was going for, it was time to build the skeleton – two bamboo poles attached to an old rucksack frame using gaffer tape; two cross-pieces, slightly longer than the gap between those to give space to attach limbs; and one more vertical for the ‘spine’, to which the head would attach.
Most of the shape outside of the frame came from withies – thin sticks of willow that become bendy when soaked or steamed (and bendier still if you ease each one in with soft back-and-forth bends along its length. They then firm up in their new shape when they dry, making them versatile, lightweight and relatively strong.
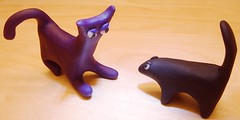
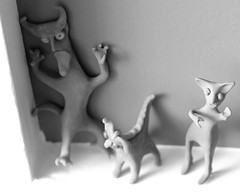
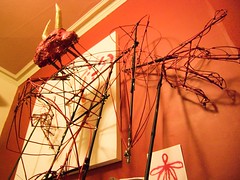 It makes sense to start with some of the main lines of the puppet before filling in any of the details of its surface – indeed, sometimes the lines are really all you need, as Ross Flemington‘s minimal, sinewy minotaur puppet demonstrated. Most of the impact comes from the overall shape and the movement, especially in low light.
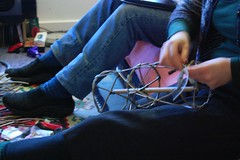
The sections of the limbs for most of the puppets started with rings of willow attached to bamboo canes with willow cross-pieces. With these stuck in place, further withies are added to make a strong, stable structure.
There are many ways to attach sections of limbs together. Perhaps the simplest is to drill a hole through the bamboo (with gaffer tape around it to help prevent splintering) and connect them with cable ties and/or wires. Another technique is to make two half-circles of wire and attach them – interlocked – to the ends of the ‘bones’. I wanted to restrict Mashi’s knees to one axis of rotation, so I held those joints together with nuts and bolts. I found that the nuts would slowly work themselves loose, a problem I was later told can be avoided by doubling up the nuts.
The head, antlers and hands were mainly made of chicken wire and papier mache – which allows finer detail than willow, at the expense of added weight.
The biggest technical challenge for me was the legs. These are often omitted from big willow puppets, or at best they are vestigial – which makes sense, since the torso typically starts just a little way above the puppeteer’s head, and most people want to control its arms using their own. I decided to have arms hanging freely (but bent at the elbows) instead, allowing me to have legs capable of dancing, walking or spreading.
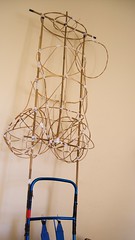
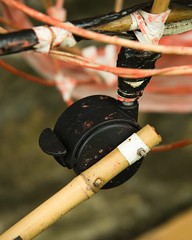 That was the fun part – legs that just walked stiffly would have been too easy. I wanted ones that could swivel outwards and upwards, but always kept the knees at an appropriate angle. The answer was hip-joints made with wheels from an old desk – rotation around their base allowed them to move up and down and walk, while the movement of the wheels themselves allowed the squatting action. Since they are still constrained on one axis, the knees always stay upright as long as you stay within their normal range of movement, so that walking and other movements could be controlled completely from the feet.
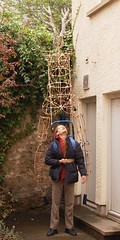 Once it was operational, the puppet wasn’t hard to use – though having something taller than yourself strapped to your back is challenging when the wind blows! A trip up Calton Hill on a windy day convinced me to greatly scale back my original plans to cover most of the puppet in a skin of tissue paper and muslin, and in the end I only covered a few parts, mainly to emphasise the outline and certain features.
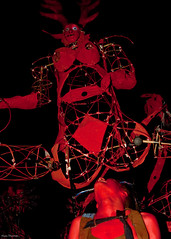 The night itself was a huge amount of fun – the crowd obviously really enjoyed the puppets, especially appreciating our presence at times when they couldn’t see much else going on. The interaction with the audience – something many groups avoid at Beltane – was particularly delightful. One Italian punter proposed to Mashi, and a couple of little kids shook her hand. With six foot six of puppet over my head (all in all, Mashi is around 10′ 8″ tall) I was able to loom like never before.
I took her out again at the Meadows Festival just for fun, and to the Leith Festival with official endorsement from the organisers – dancing through the streets in the sunshine, freaking out small children, and so on. Since then, though, she was just been lying on the roof of my kitchen extension the storms the other week, when she blew all the way to the far side of the garden. Maybe it’s a sign that I should patch her up and take her for another spin…
 For this year I volunteered to try something a bit different, and do an Air Point without any performers at all. Instead I decided to create a sculptural installation – a sort of giant horizontal dreamcatcher, spiralling down in a tornado shape in the middle.