Oolong’s Zoo

Sunday, November 13, 2011

Third Giant Puppet: Hati the Wolf

Samhuinn

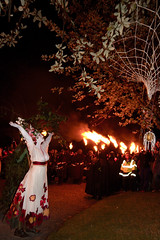
The Wild Hunt in 2007 – photo by DecoByDesign (not my wolf)


The Samhuinn Fire Festival in Edinburgh has more often than not featured a pack of wolves in one form or another – the Wild Hunt, hounding the spirits of Summer,  is one of its recurring symbols, and for me has been one of the big highlights of the Samhuinns I have attended as an audience member.

The Wolves in 2010 were largely metaphorical, more lupine humans than humanoid wolves, but they still tore the vitals from our fantastical-animals Summer Troupe. This year the wolves were less numerous, but wolfier – just two of us with giant puppets.

When I started thinking about this year’s festival, I found myself with an unusually clear vision of the puppet-wolf I wanted to make. A lot of my art comes out of doodling to see what emerges, so when I do have a persistent creative vision, I tend to feel like I owe it to myself to make it happen. Pleasingly, this year’s Samhuinn was even more puppet-based than last year’s, with one large group of puppeteers where usually there are several separate performance groups. Here’s a gallery of puppetry photos from the night, and here are some photos of my puppet-making process.

My wolf would be mounted on a backpack frame, like my previous puppets, but this time the head would be a couple of feet above and in front of my own head. I had a collection of much thicker bendy sticks than our usual withies – presumably also willow – that I found in the street one time, and these would be my main construction material. They’re strong, but they have a lot of give in them, so the puppet has a great deal of movement in it – freed from the traditional bamboo skeleton, it bounces around of its own accord and takes a moment to settle back down after any sudden movement. It has its own rhythm, so the operator needs to work with its impulses rather than trying to control every motion.

The May Queen at Air PointI made the head from the same thick aluminium wire I used for the tapir‘s head last year, and gave it something of a skeletal appearance by binding it in white cotton strips – offcuts from a t-shirt factory, I think, found in the Beltane Fire Society stores. I’d used the same strips for my giant dreamcatcher-style sculpture representing the element of Air at this year’s Beltane, which is a story for another blog post.

Once I had mounted the head on the sticks, I started thinking about how to make it as visible as it should be, and I hit on the idea of helping to hold and bring out the shape of the wolf with more of those cloth strips, using the same sort of crude knots I’d learned for my Air sculpture. After some thought, I concluded that I needed to cover the sides of it and the head with some cloth. I left the back open, a decision I would regret slightly in the torrential rain of Samhuinn night.

Hati's mawI decided I wanted to be able to control the jaw so that it could snap at things, howl and so on, as seemed appropriate. I achieved this with a hinge similar to the one I used for last year’s tapir, with springs to keep the jaw shut and a string to open it at will. I mounted the string towards the back of the jaw, so that it also afforded a good deal of control over the whole head and the body it’s attached to – pull the string back towards the body and the jaw alone opens; pull it forwards and the entire puppet stoops. The springs are pretty loose, so the puppet chatters to itself.

Hati's eyes
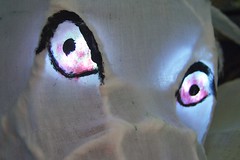
The eyes are illuminated with the same kind of cheap push-on lights I used for Mashi‘s eyes, and Tara the tapir’s brain. I mounted them on wire, with several extra pieces of gaffer tape for stability. The lights are pretty unreliable – they were flickering off when they got a knock, before I put them in – but in the end they made it through the night without any problems.

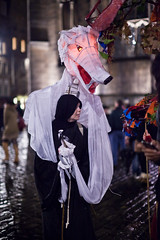
Hati meets the Cailleach. Photo by Raini Scott.

The front legs are made from strips of the white cotton, plus a sheet of muslin for the upper part. They are attached to paws made of wire and bound in cotton, with claws made of Fimo Air Light and coated in PVA glue for shininess and waterproofing. The paws are attached to sticks of bamboo for control. Inspired by careful observation of Muppets in action, I made sure that I could control both arms with one hand, with the sticks crossed over, leaving my other hand free to operate the mouth and head.

The fangs are made from the same air-drying clay as the claws, while the rest of the teeth are just torn-up tissue paper and PVA, formed around a little cone of plastic sheeting and then immediately removed. This technique allowed me to make as many teeth as I wanted very quickly.

One of the bits that I left till last, in case I ran out of time, was the hind legs. These aren’t really part of the puppet; I just sewed tubes of muslin around each of the shoulder straps, hiding the incongruous blue plastic. Then I cut a series of slits at the bottom of the muslin, and using PVA I very quickly formed the ends of the cloth into little claw shapes.

Here’s the finished puppet in action, indoors.

And here are some clips from the night itself: clip 1, clip 2, clip 3.

SamhuinnI was hugely impressed with everyone’s puppets in the end. My co-wolf Zoë did me proud; Ross’s three-person ice giant was a wonder, with its disembodied head and articulated hands on mighty poles, as was Darren’s one-person murder of crows; Helen’s lion, Frank’s pirate, Karin’s firefly, Kay’s moth queen, Morag’s Kali, Neil’s headless hobbyhorseman, Judy’s nightmare and Franzi’s tree were all things of beauty.

Many thanks to everyone in the group – and to all the photographers who took great photos, and everyone else involved as performers, tech, stewards or audience members. I had one of the best nights.

Samhuinn

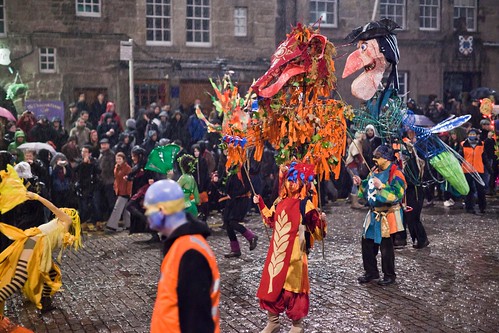
Summer puppets. This and previous photo by Chris Scott


posted by frm at 15:40  

Monday, March 31, 2008

How I Make Creatures That Aren’t Cats

I’m a cat person; I always lived with cats when I was a kid, and their moods and body languages are deep-seated in my psyche. If I just sit down to doodle with a lump of clay, a cat tends to be what comes out. That’s no excuse though! This world is full of interesting creatures which aren’t cats, with many more imaginary beasts noodling around in our collective consciousness – so I often make an effort to sculpt other critters.

Much of what I wrote in How I Make Cats applies more-or-less across the board, so rather than going in to great detail about every beastie you might like to make, I am instead going to try to summarise what makes them unlike cats to sculpt, looking at distinguishing features rather than techniques…

  • http://www.flickr.com/photos/0olong/34156428/Dogs
    Quite a lot like cats, superficially – but the snout and the floppier, less-pointy ears make all the difference to their faces, the body language of dog-tails is quite different from that of cats (although it is not unrelated) and their legs are a bit meatier.
  • http://www.flickr.com/photos/0olong/402277594/in/set-72057594090341738/Fish
    The sinuousness of the fish is quite pleasing, although its lack of limbs somewhat narrows the range of possible creative expression. On the other hand fish, more than almost any land animal, invite boundless creativity on the colouring front, and eyes can say a lot – especially if you take a cavalier attitude to the question of whether fish should have eyelids. One tricky thing about making free-standing fish is to make sure they’re either curvy enough or fat enough not to topple over. If you’d rather they go on a wall or something like that, you’ll want to think about fixing a loop of wire or a magnet to the back.
  • http://www.flickr.com/photos/0olong/444883636/in/set-72057594090341738/Pigs
    Pigs are sort of like really fat, pinkish cats with flattened snouts, beady eyes (for which the easiest thing is probably to use actual beads) and little curly tails. They also have trotters rather than paws, if you’re into that level of detail, and their ears stick out a lot more.
  • http://www.flickr.com/photos/0olong/35168352/Beavers
    The national animal of Canada! The humble beaver is perhaps the gnawingest of all beasts. Its main distinguishing feature is its broad, flattish tail. It also has a sort of blunt-ish, snuffly snout, and to make their beaverishness obvious you might like to give them two prominent front teeth – although they don’t really stick out that much in real beavers.
  • http://www.flickr.com/photos/0olong/34156449/Lizards
    Lizards are fun. Low on the ground, their legs protrude from their sides and their serpentine bodies make for lovely dynamic curves. Sometimes I might give a lizard a spiky spine, pinching vertebrae out of the flesh of its back, but they don’t always need it.
  • http://www.flickr.com/photos/0olong/214364621/Dinosaurs
    Like many people, my mind is occasionally occupied by velociraptors, with the odd hadrosaur also passing through from time to time. Paleozoological rectitude has never been a major concern of mine, so I freely make nameless dinosaurs which sit on their haunches or stand on two feet and a tail, roaring, waving little arms in front of them, and generally trying to look threatening.
  • Dragons
    A perennial favourite, most people who ever sculpt in polymer clay at all probably end up making dragons at some point. They take more work than most of the things I make, thanks to the wings, tails and facial detail – the things that make something identifiably a dragon, and not just a confused dinosaur. There’s plenty of latitude in making dragons though, in the absence of any real-world reference there’s nothing much to stop you from saying ‘well my dragon is fluorescent pink, with two tails and a head like a ferret’s.’
  • http://www.flickr.com/photos/0olong/315945803/Demons
    Being both mythical and endlessly various, demons basically allow totally free rein to the imagination. Often they have claws or horns, which you can make by extruding nodules from the clay and then pulling and squeezing and rolling the ends until they are sharp and fearsome, or make separately as tiny little cones, which it’s sometimes worth cooking in advance so that they don’t buckle when they’re attached – a trick which is even more worthwhile with sharp teeth. The monstrosity of demons invites doodling and experimentation; I leave the details up to your subconscious.

Most generally, if I don’t feel like I’ve got a handle on what would make it obvious that a given clay creature is supposed to be the animal I’m aiming for, I run a Google Image Search and maybe check out Wikipedia, which usually has a couple of good pictures.

posted by frm at 13:12  

Thursday, January 11, 2007

How I Make Cats

Before I start: Bear in mind that everyone is different; nobody ever taught me how to use polymer clay; and what works for me won’t necessarily work for you… or even for me on a different day. Experimentation is key, and if I ever had to stop messing around when I’m making my critters, I’d probably stop altogether.

All that being said, it can be helpful to get a glimpse of how other people do what they do, so here goes…

Make a ballWith almost any sculpture I’m making, I begin by kneading the clay into a ball. I squish it and roll it and warm it till I’m happy with its consistency, then I make it spherical and work from there.

Pull out appendagesThe next thing is to pull out the various appendages: Four more-or-less equal legs, a longer tail and a fatter head.Keep sculpting till it's a plausible cat shape Give the head a couple of ears, and it should already be starting to look a little bit like a cat. It might even have some personality – if so, you might like to work with it.

Get the whole thing into a shape you're happy with, paying some attention to body languageEither way, keep making the tail more tail-like, keep making the head more cat-like, and hopefully personality will emerge, whether through design or of its own accord.

The next thing is the eyes, and for me they are the single most important part of almost any critter I make. It’s amazing how much they can express, and how different that expression can be made by a shift of a millimetre or less. So take care over the eyes, but be prepared for them to surprise you.

Make a tiny sausage for the eyeballsI start by rolling out a sausage of clay, because it’s easier to divide a sausage evenly. Split the sausage into two equal parts and roll them into ballsI tend to use glow-in-the-dark clay for this, because surprise cat eyes glowing in the dark amuse me, but obviously it’s down to personal preference. Divide the sausage into two roughly equal parts, and roll each one into a ball. Affix the eyesUnevenly sized eyeballs give an air of derangement, which is fun when you’re in the mood, but not always desirable. Attach the balls to the front of the head, and presto! You now have a cat that can stare at people.

Repeat the procedure to make two tiny pupilsNext up are the pupils – each one half of a very small black sausage. Attach the pupilsThis is one of the fiddliest bits of the whole process, because the amount of clay involved is so tiny and black; I sometimes resort to using a tool to attach them to the eyeballs.

Now the eyelidsOnce the pupils are in place, I usually add eyelids. Sometimes I give a cat upper and lower lids, but most often I stick with just upper lids, each of which is made from a semi-circle of clay, created by forming a ball, then squashing it and halving it.Shape the lids into rough semicircles and carefully fix them on The precise angle at which the lids are attached can easily make the difference between a critter which is sweetly looking for affection, and one which is brimming over with malevolence – great care is called for!

Now just make any finishing touches, and it's ready to bake!Once the cat has eyes in place, it is time to concentrate on the details of its body language – a tail is a beautifully expressive thing; the set of a cat’s ears and the angle of its head can tell you a great deal; the way it’s standing is crucial too.

That’s about it; if the texture of the piece is okay and there aren’t any niggling mistakes, it’s time to stick it in the oven! Sometimes it is worth laying a cat on its side at this stage, or supporting it around the middle, because polymer clay legs are flimsy things at the best of times – and can turn downright floppy while they’re being baked.

Technorati tags: , , ,

posted by frm at 13:58  

Wednesday, January 3, 2007

Different Kinds of Polymer Clay

There are many types of polymer clay available, if you know where to look, and they all have advantages and disadvantages. Many people will argue passionately for one variety or another, but I have noticed that some of the major brands are surprisingly inconsistent between colours, and possibly between batches – so sometimes I see someone dismissing Premo Sculpey in favour of Fimo Soft, on the grounds that the latter is too soft and floppy, but sometimes I see the opposite.

Sculpey III and Fimo Soft are the varieties I see for sale most often in the UK; Fimo Soft has largely supplanted Fimo ‘Classic’, probably because most people – kids especially – can’t be bothered with the extensive kneading the latter requires. However, the Soft kind is sometimes too soft, failing to hold delicate shapes or support the weight of a sculpture on legs. Sculpey III is if anything even softer, while in my experience Premo Sculpey is slightly firmer, but still a good deal less work than Fimo Classic. How firm you like your polymer clay has a lot to do with how hot your hands are, your patience, and the delicacy of the sculpture you are trying to achieve.

Much more significant than the differences between these mainstream brands is the leap from them to Super Sculpey or Super Sculpey Firm. These are far better at holding delicate shapes and fine detail, making them much more appropriate for some kinds of work. They do take a lot more kneading to make them pliable, but I find that only a minute or two of squashing and rolling gets them ready to use. Their big disadvantage is in the colours: Whereas the more common brands of polymer clay come in a dizzying range of attractive colours, standard Super Sculpey is always roughly the colour of northern-European skin, while the Firm variety is a sort of granite-grey. Obviously that’s great if you happen to want to make something in one of those colours, but otherwise you’ll be looking at a paint job at the end of it; of course some people are very happy painting their sculptures, but it’s not for everyone.

Achieving quite similar effects are Puppenfimo, also known as ‘miniature doll Fimo’, and Sculpey Living Doll. Aimed chiefly at the ‘art doll’ market, these are slightly softer than Super Sculpey, and the latter is available in several different fleshly colours. They retain a slight softness when cooked, and make for tough little sculptures which are slightly translucent, like human flesh.

Many other kinds of polymer clay are available – Creall-Therm, Cernit, Kato and Makin’s all have their own brands, about which I have heard good things, while Fimo and Sculpey have a range of other varieties which I haven’t touched on here. New products are devised on a regular basis – polymer science is very much a living field, and the polymer clay companies are spurred on to ingenious new applications by current high levels of interest in polymer clay as an artistic medium.

posted by frm at 12:10  

Powered by WordPress