Does this control box for my wave-based interactive animations count as a sculpture? I’m thinking it just about does, even though it’s a far cry from the sort of thing I normally include here; either way, my main post about it is over on my generative art blog
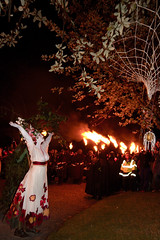
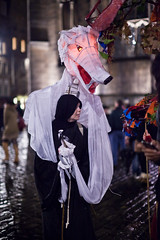
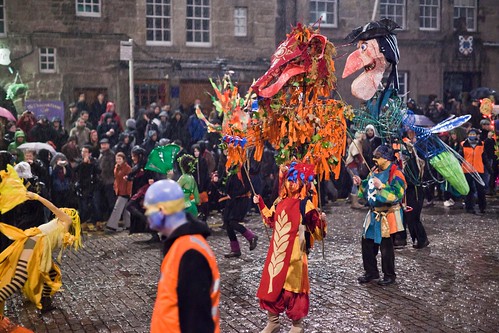
The Samhuinn Fire Festival in Edinburgh has more often than not featured a pack of wolves in one form or another – the Wild Hunt, hounding the spirits of Summer, is one of its recurring symbols, and for me has been one of the big highlights of the Samhuinns I have attended as an audience member.
The Wolves in 2010 were largely metaphorical, more lupine humans than humanoid wolves, but they still tore the vitals from our fantastical-animals Summer Troupe. This year the wolves were less numerous, but wolfier – just two of us with giant puppets.
When I started thinking about this year’s festival, I found myself with an unusually clear vision of the puppet-wolf I wanted to make. A lot of my art comes out of doodling to see what emerges, so when I do have a persistent creative vision, I tend to feel like I owe it to myself to make it happen. Pleasingly, this year’s Samhuinn was even more puppet-based than last year’s, with one large group of puppeteers where usually there are several separate performance groups. Here’s a gallery of puppetry photos from the night, and here are some photos of my puppet-making process.
My wolf would be mounted on a backpack frame, like my previous puppets, but this time the head would be a couple of feet above and in front of my own head. I had a collection of much thicker bendy sticks than our usual withies – presumably also willow – that I found in the street one time, and these would be my main construction material. They’re strong, but they have a lot of give in them, so the puppet has a great deal of movement in it – freed from the traditional bamboo skeleton, it bounces around of its own accord and takes a moment to settle back down after any sudden movement. It has its own rhythm, so the operator needs to work with its impulses rather than trying to control every motion.
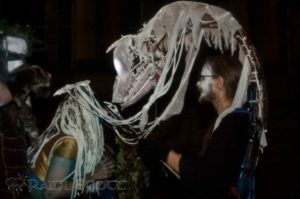
I made the head from the same thick aluminium wire I used for the tapir‘s head last year, and gave it something of a skeletal appearance by binding it in white cotton strips – offcuts from a t-shirt factory, I think, found in the Beltane Fire Society stores. I’d used the same strips for my giant dreamcatcher-style sculpture representing the element of Air at this year’s Beltane, which is a story for another blog post.
Once I had mounted the head on the sticks, I started thinking about how to make it as visible as it should be, and I hit on the idea of helping to hold and bring out the shape of the wolf with more of those cloth strips, using the same sort of crude knots I’d learned for my Air sculpture. After some thought, I concluded that I needed to cover the sides of it and the head with some cloth. I left the back open, a decision I would regret slightly in the torrential rain of Samhuinn night.
I decided I wanted to be able to control the jaw so that it could snap at things, howl and so on, as seemed appropriate. I achieved this with a hinge similar to the one I used for last year’s tapir, with springs to keep the jaw shut and a string to open it at will. I mounted the string towards the back of the jaw, so that it also afforded a good deal of control over the whole head and the body it’s attached to – pull the string back towards the body and the jaw alone opens; pull it forwards and the entire puppet stoops. The springs are pretty loose, so the puppet chatters to itself.
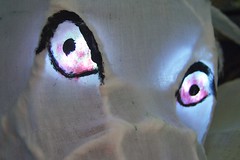
The eyes are illuminated with the same kind of cheap push-on lights I used for Mashi‘s eyes, and Tara the tapir’s brain. I mounted them on wire, with several extra pieces of gaffer tape for stability. The lights are pretty unreliable – they were flickering off when they got a knock, before I put them in – but in the end they made it through the night without any problems.
Hati meets the Cailleach. Photo by Raini Scott.
The front legs are made from strips of the white cotton, plus a sheet of muslin for the upper part. They are attached to paws made of wire and bound in cotton, with claws made of Fimo Air Light and coated in PVA glue for shininess and waterproofing. The paws are attached to sticks of bamboo for control. Inspired by careful observation of Muppets in action, I made sure that I could control both arms with one hand, with the sticks crossed over, leaving my other hand free to operate the mouth and head.
The fangs are made from the same air-drying clay as the claws, while the rest of the teeth are just torn-up tissue paper and PVA, formed around a little cone of plastic sheeting and then immediately removed. This technique allowed me to make as many teeth as I wanted very quickly.
One of the bits that I left till last, in case I ran out of time, was the hind legs. These aren’t really part of the puppet; I just sewed tubes of muslin around each of the shoulder straps, hiding the incongruous blue plastic. Then I cut a series of slits at the bottom of the muslin, and using PVA I very quickly formed the ends of the cloth into little claw shapes.
I was hugely impressed with everyone’s puppets in the end. My co-wolf Zoë did me proud; Ross’s three-person ice giant was a wonder, with its disembodied head and articulated hands on mighty poles, as was Darren’s one-person murder of crows; Helen’s lion, Frank’s pirate, Karin’s firefly, Kay’s moth queen, Morag’s Kali, Neil’s headless hobbyhorseman, Judy’s nightmare and Franzi’s tree were all things of beauty.
Many thanks to everyone in the group – and to all the photographers who took great photos, and everyone else involved as performers, tech, stewards or audience members. I had one of the best nights.
Summer puppets. This and previous photo by Chris Scott
Lately I’ve been employed on a part-time freelance basis by a company called Anarkik3D Ltd., based at Edinburgh College of Art. I re-did their web site so it’s easily maintainable, running on WordPress, but mostly I’ve been testing the new version of their 3D haptic modelling software package, Cloud9.
I got into this because as a sculptor with an interest in computer graphics, I’d been wanting for years to try out a fully 3D, tactile interface for 3D modelling. Even in two dimensions the mouse is a poor interface tool for many things , most notably for drawing; no surprise, then, that it’s hopeless for sculpting. The 3D packages I’d used worked around this by using systems of 3D construction based on 2D views and interactions that bear almost no resemblance to sculpting at all, compensating for the inadequacy of the physical interface with elaborate systems for controlling every detail of what you’re trying to create. I’ve used less sterile packages since then, but they’ve still never felt anything much like sculpting.
Cloud9 works with hardware allowing 3D interactions with 3D models, enhanced by the sense of touch (which is what ‘haptic’ means). You move the controller around in space, and when you touch a virtual object, you can feel that it’s there. It’s designed to be intuitive to use, and it’s a far cry from the technical sophistication and precision of many 3D packages, partly because the creators have self-consciously made it ‘un-CAD-like’, aiming for such a gentle learning curve that artists and designers can sit down with little or no training and start making things right away.
On the whole I think it does a good job of achieving what it sets out to. The software is limited in various ways – it doesn’t allow you to control lighting, for one thing, and textures are limited to flat colours – but then, it is quite possible to create something in Cloud9 and then import it into Maya, Blender or whatever to do that stuff. Hopefully more of it will be included in future versions, though there is obviously a fine balance to be kept between adding features and keeping it simple.
Some of the most interesting possibilities of Cloud9 involve 3D printing of objects created – both company founder Ann Marie Shillito and student Farah Bandookwala have been creating some interesting jewellery this way. For my part I am equally intrigued by the prospect of combining this with 3D scanning to allow the physical sculpting of 3D creations which are then imported into a computer for further enhancement.
Here is a screenshot of a cat I made with Cloud9, because cats are my sculptural ‘Hello World’ examples – the thing I make when I want to be sure I’ve got some kind of handle on a new medium. Making this involved creating a sphere and then deforming it bit by bit in 3D to make it more cat-shaped. The amount an object can be deformed is limited by the number of triangles that make it up, so I had to periodically use the ‘Sub-Mesh’ function to add more.
Below is a sort of rough 3D sketch for a giant puppet I’m planning. This was fun to make, and some bits at least were easier than making a physical version, even a small one. I’d already drawn a bunch of sketches on paper – not something I often do – but it’s great being able to see it from different sides, and so on.
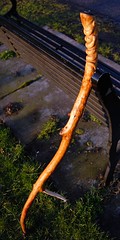
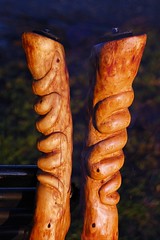
I took it home, flaked off what was left of its bark, sawed off the rough ends and sanded it down. Then I stained it slightly with tea, and once it had fully dried I rubbed linseed oil in to preserve it, to bring out the colour and to give it a slight sheen.
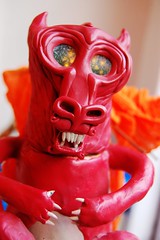
Later I mounted a screw in the top so that I could use it as a monopod. This would hold my camera still on the top, or indeed anything else there that has the same kind of thread as a camera – a 1/4″ Whitworth thread, which turns out to be incredibly hard to find in Britain, where all the nuts and bolts went metric years ago. I made a dragon with glowing eyes, about 6″ tall, to place on top.
My first attempt just involved drilling a hole and mounting a bare, topless bolt in it using epoxy putty. This turned out to be a mistake – the mounting needs to be strong enough to withstand repeated screwing and unscrewing, and this wasn’t, leading to my camera falling off and breaking slightly when someone jostled against me one night.
My second attempt used the camera screw and its plastic mounting from a monopod walking-stick I bought, whose manufacturers had made much the same mistake as me – it was originally attached to a feeble piece of plastic that broke almost immediately after I bought it; I took it back, got it replaced, and the second time, with great care, it lasted about a week. Still, the remaining mounting was sturdy enough, and with a large drill I made a hole in the top of my staff just big enough to accommodate it, and fixed it in place once more with epoxy putty. It has held ever since. The curve of the staff makes it easy to spin around in order to screw and unscrew it.
Last year I realised that the staff would make a much more comfortable walking stick if it had finger-grips, so I started carving some into it. After I had been at it for a while I realised that the knot just above the grips I was carving looked a bit like an eye, and the snake design naturally followed.
It’s not easy to tell what kind of tree driftwood comes from, in general, but based on the opinion of a professional wood-worker I met, I think my staff is made of yew – the density of little knots suggests an evergreen, while weight and strength of the wood rule out most other varieties of softwood. I use the staff for hiking, supporting my weight when I have a leg injury, and as a monopod. It is so strong that despite its curve, it can hold my entire weight.
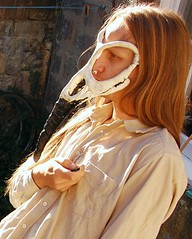
Since getting involved with Edinburgh’s Beltane Fire Society a couple of years ago, I’ve got quite into making costumes. The blurry area between costuming and sculpture is particularly interesting to me, along with its close neighbour puppetry. For last year’s Samhuinn – a festival laying to rest the last dregs of Summer and ambivalently celebrating the arrival of winter – I dressed up as a sort of skeletal gentleman-raven, one of six Valravn embodying inevitable death. Fun fun. I made myself a top hat out of cardboard, silk and double-sided sticky tape; a cravat out of the same silk; and I re-tailored a plain woollen waistcoat from India, to give it a tighter fit and a collar of a sort that was fashionable around the end of the nineteenth century.
The biggest feature of the costume was the six-metre-wingspan folding raven wings we all made. I sat out of the design process for these, but we all chipped in practical work to help make them. The ‘bones’ of each wing are made of four lengths of plastic plumbing pipe, hinged so that they move in a pretty realistic flapping motion. One of the middle pair of bones on each side is longer, so that it’s possible to use it as a handle to control their motion, and there are little docks for these so that they can lock in place and leave hands free.
Attached to the bones are three different lengths of individual ‘feathers’, each one having a spine made of one or more thick wires, held in a sheath of black drill cotton, so that the wings extend almost two feet further than the bones. The inner feathers are sewn together, but the outer ones are left separate, one of the notable features of corvid wings being the way the feathers fan out when they fly. Most of the work went into the feathers, I think – the basic design could be done much more easily without such extreme attention to detail. The wings probably warrant a whole post to themselves, with clearer photos, so I’ll return to them.
Each of us had a different mask, some very different, some with a similar basic design. Mine is built on a framework of thick, soft aluminium wire. Once I’d made the basic shape, I wrapped it in wet muslin (for grip) and built white Efaplast Light on top of it to create a bird-skull. For the beak – black, in keeping with real raven skulls – I wound wire around its curve, and wrapped it in thin black muslin, slightly transparent so you could see the shape underneath. To keep it in place and in the right shape, I coated the muslin with PVA glue. It’s held on with a strip of elastic sewn on each side of the eye.
For this year’s Samhuinn – tomorrow! – I’ll be wearing a large tapir puppet, about the size of a real adolescent tapir, part of a troupe of puppeteers and dancers representing the doomed vitality and movement of summer. More on that under ‘Tara the Tapir‘.
I’ve been having great fun lately customising USB sticks ((thumb drives, flash drives, whatever you want to call them…)) using epoxy putty. The putty doesn’t require any baking, and it seems to be hard enough and strong enough to survive in pockets full of keys for long periods without any visible scratching – although it does accumulate smudge marks very quickly, they’re easy to wipe off.
It’s an interesting challenge to decorate a USB drive, because you start out with a sort of rectangle a few millimetres thick, and it’s probably best not to make the final product very much bigger than that, so that it doesn’t take up too much space in pockets and can still be plugged into computers which might not have much space around their USB sockets. That means you’re constrained to subjects which can be plausibly fitted into a long, thin cuboid with a minimum of protrusions. You also ideally want things with a head or some other part which can be unobtrusively removed, with a join just at the right distance from one end…
The basic technique is pretty straightforward – you just mix up the epoxy putty with the hardener, roll it into a sheet and cover the drive in it. Leave space for anything you don’t want to obscure, like the LEDs most pen drives have that light up to show when they’re active, or loops for keyrings. There are two approaches you can take at this stage. One way is to use a thin sheet and add more putty to that – freshly-mixed epoxy putty sticks extremely well to almost anything, but especially itself. The other way is to use more putty to begin with, and extrude or carve from that.
There are many different varieties of epoxy putty available. I’ve been using Sylmasta A+B (formerly SuperCarve), and so far I’m very happy indeed with the new reformulated version of this – the colours are pure and vivid, where before the blue and the yellow were both slightly greenish ((I’m told their white has been reformulated to be brighter, too, but I still haven’t used up all of my 500g block of the previous formulation so I haven’t tried that yet.)). They’ve also extended the range to include brown and black, so it’s now possible to mix almost any colour from those available. For about £50 I got 250g of each of five colours, which should go a looong way. I have also had good results using metallic powders you can rub into the putty while it’s still soft. Most of the powder sticks well to the putty if it’s rubbed in well enough, but it’s worth varnishing these afterwards to be safe.
So far I’ve made three USB monkeys, a couple of aliens, a zombie badger that runs Linux and a fish that really didn’t work the way I wanted it to. I might make a crocodile next. Any other suggestions are welcome, whether or not you want to buy them yourself! As ever, I am very happy to take commissions…
I moved to Edinburgh a few years ago, and when I did I left a couple of boxes’ worth of clay sculptures in London. A couple of months ago I finally got managed to bring most of them up to Scotland with me. I guess I’ll try to sell most of them; some could probably make good Christmas presents for people, and so on. I’m still pondering prices.
It was fun, in any case, just taking all my old sculptures out, laying them on the mat and getting photos of them. I think I’d missed them a bit, without really being conscious of it.
I miss working with clay; I’m currently trying to find somewhere in Scotland where I can go for a couple of hours or something, every now and then. Every week, maybe. There are just so many things you can do with ceramic clay that you can’t really do with polymer, and I want to be doing some of them!
I also have a box of unfired clay sculptures still left in London, including most of The Bunny Mob (only the original, Alfonso di Bunniti, is here with me in Edinburgh) which had been sitting on a never-touched shelf all these years, but have now needed to be moved, and some of them got broken. I’m not sure how I’ll fix them and get them fired, but I guess I’ll get something figured out sooner or later. Sooner, I hope.
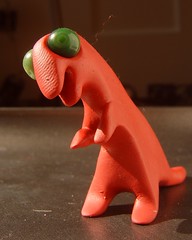
I first got enthused reading about Magic Sculp, but eventually established that even the cheapest UK supplier I could find, Sylmasta, charges around three times as much as it goes for in the US (and about twice as much as I pay for the same weight of polymer clay) – but as it happens, they also sell their own brand of epoxy modelling putties, Sylmasta A+B (white, or at least very light grey) and Super Carve (available in a range of colours), which also come highly recommended by random people off the internet. Milliput is the only epoxy putty I’d been exposed to in person before, and it’s very easy to get hold of – but it’s relatively expensive, and not very highly regarded by most of the sculptors I’ve seen expressing opinions.
Epoxy putty of any variety has several advantages over the likes of Fimo and Sculpey – it doesn’t require baking, it adheres firmly to almost any surface and it ends up being far stronger and far harder. On the other hand, it has a faintly unpleasant petrochemical smell, requires a bit more work and tends to work out more expensive (at least in Europe).
The putty starts out in two parts, a resin and a hardener, and you need to thoroughly mix and knead them before you start. This is probably best done with gloves really (at least according to some sources) but I’ve been doing it bare-handed so far without any obvious ill effects. As soon as it’s mixed, it starts hardening – on average, you’ve only got a couple of hours to work with it before it’s really hard, and in the first hour or so it goes from being distinctly on the floppy side to being really very firm; depending on what you’re making, the firmness might be very desirable or a big pain.
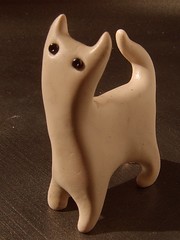
Me being me, the first thing I made was a cat. This was fun, and went fairly smoothly, but it brought out what to me is the most striking difference between epoxy putty (at least, A+B) and the polymer clays I’m used to: It’s near-total lack of elasticity. It’s one of those things you don’t think much about until it’s gone, but it turns out to make a big difference. I started to extrude limbs in the way I usually do when I make cats, and found I kept needing to smooth over the cracks I was making as I went.
One advantage of this is that things stay where you put them much more readily than they do with polymer clay, which sometimes springs back into place a little. Also, the putty is very quick to bear the impression of anything that presses against it, which is potentially very useful even if it isn’t always desirable. It’s not sticky to the touch, despite its excellent adhesive qualities when left in place – but it did prove sticky enough to easily attach little beads for eyes, which is handy given the limited range of colours I currently have available.
Once it’s cured it has a pleasing weight to it, and it’s really good and hard; it feels altogether far more substantial than polymer clay, and it’s easy to beliebe what I’ve read about its vastly greaters strength.
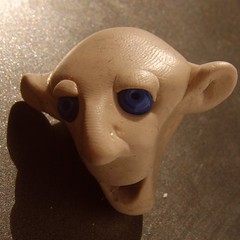
After the cat I still had lots of putty left over which I needed to use before it set hard, so I set to work making a human face. Humanoid, anyway… the squishiness of the material tripped me up a bit here – it is putty, and it feels and works like it. The head came out okay in the end, but it’s sort of… meltier than I’d really intended.
I regretted not leaving the putty to firm up for a while before trying to do something like that, but then when I did leave a bit more to harden, I ended up going away for too long and it was almost impossible to work! We live and learn though, and I always expect to make mistakes when I try out a new medium.
I made the same mistake again when I tried out the bright read Super Carve I bought – it’s noticeably a good deal softer than the A+B, and the dinosaur I made kept sagging gently to one side or the other for a long time after I first made it, as if it was drunk and sleepy. I straightened it up repeatedly, but in the end it still sort of slopes forwards and to one side; it’s alright, it mostly just looks like it’s staring at something much smaller than itself, but I made sure to leave it for about half an hour before I started working on my next project – a big dragon, to which I will return once it’s finished.


")


