 I’ve been having great fun lately customising USB sticks ((thumb drives, flash drives, whatever you want to call them…)) using epoxy putty. The putty doesn’t require any baking, and it seems to be hard enough and strong enough to survive in pockets full of keys for long periods without any visible scratching – although it does accumulate smudge marks very quickly, they’re easy to wipe off.
 It’s an interesting challenge to decorate a USB drive, because you start out with a sort of rectangle a few millimetres thick, and it’s probably best not to make the final product very much bigger than that, so that it doesn’t take up too much space in pockets and can still be plugged into computers which might not have much space around their USB sockets. That means you’re constrained to subjects which can be plausibly fitted into a long, thin cuboid with a minimum of protrusions. You also ideally want things with a head or some other part which can be unobtrusively removed, with a join just at the right distance from one end…
 The basic technique is pretty straightforward – you just mix up the epoxy putty with the hardener, roll it into a sheet and cover the drive in it. Leave space for anything you don’t want to obscure, like the LEDs most pen drives have that light up to show when they’re active, or loops for keyrings. There are two approaches you can take at this stage. One way is to use a thin sheet and add more putty to that – freshly-mixed epoxy putty sticks extremely well to almost anything, but especially itself. The other way is to use more putty to begin with, and extrude or carve from that.
") There are many different varieties of epoxy putty available. I’ve been using Sylmasta A+B (formerly SuperCarve), and so far I’m very happy indeed with the new reformulated version of this – the colours are pure and vivid, where before the blue and the yellow were both slightly greenish ((I’m told their white has been reformulated to be brighter, too, but I still haven’t used up all of my 500g block of the previous formulation so I haven’t tried that yet.)). They’ve also extended the range to include brown and black, so it’s now possible to mix almost any colour from those available. For about £50 I got 250g of each of five colours, which should go a looong way. I have also had good results using metallic powders you can rub into the putty while it’s still soft. Most of the powder sticks well to the putty if it’s rubbed in well enough, but it’s worth varnishing these afterwards to be safe.
There are many different varieties of epoxy putty available. I’ve been using Sylmasta A+B (formerly SuperCarve), and so far I’m very happy indeed with the new reformulated version of this – the colours are pure and vivid, where before the blue and the yellow were both slightly greenish ((I’m told their white has been reformulated to be brighter, too, but I still haven’t used up all of my 500g block of the previous formulation so I haven’t tried that yet.)). They’ve also extended the range to include brown and black, so it’s now possible to mix almost any colour from those available. For about £50 I got 250g of each of five colours, which should go a looong way. I have also had good results using metallic powders you can rub into the putty while it’s still soft. Most of the powder sticks well to the putty if it’s rubbed in well enough, but it’s worth varnishing these afterwards to be safe.
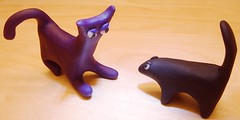
 So far I’ve made three USB monkeys, a couple of aliens, a zombie badger that runs Linux and a fish that really didn’t work the way I wanted it to. I might make a crocodile next. Any other suggestions are welcome, whether or not you want to buy them yourself! As ever, I am very happy to take commissions…
 That’s why I’m soliciting scripts. Specifically I’m looking for scripts which don’t call for elaborate staging, and will take no more than 60 seconds of animation time. If you can make a recording of the script and send it to me that’s even better, but if not I can probably get people together later to record it for us, so don’t worry about that too much.
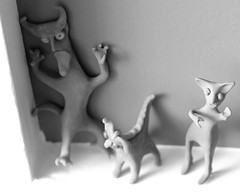 I’m open to receiving scripts by email, but what I’d like best is for people to submit them to Everything2 for Gone in 60 Seconds – a Theatre Quest, and make sure that they would work as one-minute plays as well as animations.


